General
URL decisions
Keep it simple
Minimal layers
Course Pages are as follows
- /plant
- /plant-course
- /run-plant
- /estates-mission
- /become
- /run-become
Administrators – those able to access and update the back end of the website
Users – All others
All Users of the site are listed here. Each user is either a Subscriber (everyone) or Administrator (only those working on the back-end of the site). There is now simply one membership level – CONNECT. This gives access to all content. Not all our content is restricted to CONNECT membership, but most is. Stories and inspirational pieces are open, course content and resources tend to be CONNECT.
Subscription to our Connect newsletter is currently separate to this sign-up. All details can be found here.
Images
Upload size to 32MB
Add relevant ‘Alternative Text’ – this is a short description of what features in the image, allowing those with accessibility needs and visual impairment to have images ‘read’ to them by software
Graphics
- Tall cards: 431 × 766 pixels
- Wide cards: 718 × 407 pixels
- Small or medium (general) cards: 431 × 575 pixels
- Hero: 1920 × 480 pixels
Cards in general have a fixed aspect ratio, meaning they change size but rarely change shape. When they do change shape it’s not by much so you don’t have to give too much consideration to the background image being cropped.
The hero is a different matter. It has a fixed height but its width always matches the width of the viewport (e.g. browser window, phone, etc), so the wider the viewport, the more the image is cropped. That makes the maximum width a judgement call but I think 1920 pixels is a reasonable screen size to cater up to.
All communication linked to membership can be found here. As an individual signs up to access content they are sent a welcome email.
When completing a visual, use the Yoast plugin at the foot of the page to assess and improve the visual’s Search Engine Optimisation (SEO).
Focus keyphrase – the ‘phrase’ you think someone would enter into a search engine in the hope of finding your piece
Meta description – this could be identical to the excerpt, or the first two lines of the visual/page – a short paragraph that contains the relevant keyphrase and outlines what the visual/page is about.
Step 1: Set up redirect
Add a redirect here: https://ccx.org.uk/wp-admin/tools.php?page=redirection.php. Select options from dropdowns, refer to previous examples if needed. ‘302’ suggested for HTTP code.
Step 2: Update the page status of ‘Source page’ and ‘Target page’
On the backend of each page, update the page status from the ‘Publish’ dropdown on right-hand side, and click update.
Edit the row or module you want to link to and give it an ID, e.g. ‘my-anchor’, then add that ID to the end of your page URL, following the final forward slash and a #, e.g. ccx.org.uk/#my-anchor.
** Ensure ALL ID letters lowercase, otherwise it will not correlate with URL.
Building Pages
Kicker: Use this if your primary heading is not clear enough (it will automatically populate if the key words from the page name are not used in the primary heading. If you want to forcibly remove the Kicker you can.
Primary Heading: Use a short-form sentence to describe the page. Do not finish with a full stop
Link: DO NOT using the link, except for a specific jump link to ‘Book Now’ or equivalent
Background Type: A single image, an embedded Vimeo or a colour. Currently we will not be adding videos. More than one image can be added by clicking the ‘+’.
Overlay Type: An overlay is a semi-transparent element between the hero’s image content and text content, to improve readability. Generally you will want a black or white ‘colour overlay’ in the opposite colour to your text. Image overlays are for very specific brand uses. Once you have chosen the colour you will need to experiment with blend mode and opacity – the best settings there will depend on the amount of detail and contrast in the background image(s).
Text Colour:
Use ‘Standfirst’ for the first paragraph
Use ‘Large Paragraph’ for the second paragraph
The font sizes are fluid depending on screen size.
- ‘Standfirst’ has a range of 25–33px
- ‘Large paragraph’ has a range of 21–27px
- Standard paragraph has a range of 16–18px
CCX Quote
Quote: “Words of the quotation in quote marks”
Caption: Person whose quote it is
Citation: Where the quote is from
“Church planting can feel like a roller-coaster ride all on your own but the Plant Course helps you feel that you're not alone and works through all those things that could keep you up at night. A must for anyone who has a passion to join God's mission in bringing people to Christ and growing his church.”
St John’s Crawley
CCX Action Buttons
Accordion Title: title if needed
Accordion Introduction: explanation if needed
Section Title: this is what appears on the page
Section content: A text block should be added to a section to include any copy
You can place a 3Dbook in a light box in an accordion. When you bring up the dialog to insert one go to the ‘view mode’ tab and click ’thumbnail and lightbox’. Include the title of the book as text beneath it too.
CCX Cards – to be used across the sight for links, visuals, actions, events and courses
- Heading – add a title
- Description – add a description – keep it short
- Layout – ROW – click right, or on a phone swipe right, GRID – grid on the page, or on a phone a vertical list
- Allow user layout toggling – not active
- Card type
- Active Wide – for activities e.g. events
- General Medium – for visuals, further steps etc
- General Small – for visuals, further steps etc
- Stream (Tall) – to only show streams – not options for Card Content, each card is made individual (as an extra card)
- Topic (Tall) – to only show course content – choose the CCX course to be displayed
- Card Content Type
- Course and Visuals (filtered by taxonomy) – use to show categories/visual formats/tags/contributors/organisation specific courses or visuals (Taxonomy filtering – show ANY or ALL)
- Visuals and courses (individual selected)
- Custom query (choose specific visual IDs)
- Extra Cards – can be added to any card module
- Select URL (or manually insert one)
- Select image
- Select Card Heading
- Select Card text
- Select Card text colour (inherit from row as standard)
- Select position – (first, second, third, last)
- Card Limit – This controls the number of cards that appear in the module (particularly useful if choosing by taxonomy, the more cards you choose the longer the it takes to load) A maximum of 12 has been set else load takes too long
- Element ID – available if a jump link is needed
- Extra Class name – ignore
- Hide element from Levels – control who can view this module
The ebook viewer module is specifically for ebook files, i.e. .epub files. See a demonstration on the dummy page.
Replicate this example layout by selecting CCX Page Header and CCX Ebook View modules. Select (or upload) the .epub file from the Media Library, and populate the relevant copy to support.
To be phased out – do not use
For use when a single video is needed
When you add a video to a page using that module it will just be a grey rectangle (to reduce page load) but once the user scrolls down to it the Vimeo video will be loaded automatically.
Notes: CCX People can be used to add people to a page. Key things to note:
- When adding more than one person, the order they are listed in will be the order they appear in.
- Job Title
- If choosing to display the ‘Job Title’ choose primary ‘Job Title’ will display anything main job title (for staff this will be their role)
- If choosing to display ‘Alternative Job Title’ this will give the option to show a different job title that might be more relevant to the event. If there is no ‘Alternative job title’ for that person then their ‘Job Title’ will be shown.
- Profile
- Standard procedure is to not show ‘Profile’
- ‘Full Profile’ is what is a person’s standard bio
- ‘Short Profile’ can be created and shown if needed
Choose grid or row format

There are two modules for organisations for both
- Choose which organisations
- Be specific – list by name (default alphabetically)
- Choose ‘Basic’ or ‘Together’ partners
- Choose both
- If choosing a group, then choose the number to be displayed
- Choose colour or monochrome (only Together have monochrome logos)
- Choose owner status, both or either (if you don’t choose both, then those in the other group will not appear even if you have listed them)
Heading: only use if necessary
Description: only use if necessary
Show:
- Specify owner by name – List Owners – be specific – list by name (choose alphabetically)
- Show Basic Owners◦ Layout – Grid/Row
- Card Limit – limit to 12
- Show Together Owners (Basic/Together defined at organisation level)
- Layout – Grid/Row
- Card Limit – limit to 12
Choose grid or row format

CCX Related Content – to be used at the bottom of a page or visual to link to ‘related content’. This is automatically inserted in to all visuals and CCX courses
- Heading – add a title
- Description – add a description – keep it short
- Content Collation
- Automatic – gather related content based on the current page or visuals metadata
- Manual – enables control over what is inserted into the module
- Pages – choose pages to appear as buttons within the module
- Card Content Type – Course and Visuals (filtered by taxonomy) – use to show categories/visual formats/tags/contributors/organisation specific courses or visuals (Taxonomy filtering – show ANY or ALL)
- Pages, visuals and courses (individual selected)
- Custom query (choose specific visual IDs)
- Extra Cards – Extra cards can be added to any card module
- Select URL (or manually insert one)
- Select image
- Select Card Heading
- Select Card text
- Select Card text colour (inherit from row as standard)
- Select position – (first, second, third, last)
- Pages – choose pages to appear as buttons within the module
- Card Layout – ROW – click right, or on a phone swipe right, GRID – grid on the page, or on a phone a vertical list
- Card Limit – This controls the number of cards that appear in the module (particularly useful if choosing by taxonomy, the more cards you choose the longer the it takes to load) A maximum of 12 has been set else load takes too long
- Search
- Hide search input – hides the search bar within the module (this is the default)
- Show search input – shows the search bar within the module – this should not be needed very often
- Element ID – available if a jump link is needed
- Extra Class name – ignore
- Hide element from Levels – control who can view this module
Related Content


Do not use
Separator
Column width
Screen width
Building Content
Most content is built in Visuals,, which include ones to read and ones to watch. Visuals are also used to create events. 3D books are used to store pdfs to be sued in either visuals or pages (but are not searchable themselves). Courses can be sued for either a course or a series and may contain Vimeo videos, visuals text or 3D books. events are built as visuals but with additional time and location metadata.
Metadata is what enables our content to be searchable. We use s a number of levers to enable this.
Content in the title, excerpt and body of a visual are also available to search. The date helps manage the order of results
Visual Formats – the type of content it is including event, read, watch
People – who is involved in the content either as an author (they have had a hand in creating the piece) or subject (they are being interviewed, contributing to the piece or being spoken about)
Organisations – show the organisations linked to a piece of content or event
When adding an organisation – they should be assigned either as a Together or Basic organisation
• Together – those who we work together with. They are listed on the Together page, in the footer and have had been agreed by Team Leads as Together Associates. They have their own page on the site which show what they do, how we work with them and links to their site
• Basic – these are organisations that might be curating or hosting something and therefore need to be shown. When their data is inputted, their website should be added to connections. This is then used as a direct link from their logo
Categories – When adding categories a description should be added to be shown on the curated search page. You should not add new categories without agreement
Category – a predefined list of topics – about two or three categories are recommended per visual
Tags – any word or phrase that might help make the visual identifiable either internally (for sorting) or externally (for searching)
All our visuals are listed here.
To build a visual for content:
- Choose a title for the content that is appropriate and no more than XXX characters
- A Permalink will be created based on this title – shorten this as much as possible. Watch out for ‘2’ which means that permalink is already in use.
- Publish
- Status
- Visibility
- Time
- SEO
- Visual Details
- General
- Visual Format
- Date – to enable sort
- Replacement Date – only needed for certain events
- Visual Format
- Details
- Authors
- Subjects
- Primary Organisation
- Secondary Organisation
- Category – up to 3
- Tags – for internally sorting and external searching
- Front-end
- Thumbnail Link
- This content
- Other internal content – choose a page for it to link to
- External Link – choose an external site for it to link to
- Promoted Content – ensures it is promoted above other content
- Primary Video URL – appears at the top of the visual
- Video Duration – this uploads automatically from Vimeo but worth checking
- Show Contributor Image on Thumbnail – to be removed
- Show Featured Image in Post – As default the featured image chosen for the visual will appear within the image as well as on the thumbnail. If you would NOT like this then unclick
- Thumbnail Link
- General
- Excerpt – this is a short explanation to explain the content used on the card, as part of search and in the SEO.
- Require Membership
- CCX Team soon to be removed
- Connect – if you choose to connect then the user needs to sign into the site to see the content – this should be for any content other than events or stories.
- Featured Image – this is the image used to represent the content across the site. It need to be adaptable across landscape or portrait and should not contain any words.
- YOAST – The meta description should be a copy of the excerpt
- Visual Content – this is where the main content of the visual sits
All our visuals are listed here.
To build an EVENT visual:
- Choose a title for the EVENT that is appropriate and no more than XXX characters
- A Permalink will be created based on this title – shorten this as much as possible. Watch out for ‘2’ which means that permalink is already in use.
- Publish
- ◦ Status
- Visibility
- Time
- SEO
- Visual Details
- General
- Visual Format
- In person
- Online
- Hybrid
- Sort Date – start date
- Time – start time
- End Date
End Time - Replacement Date – Enter text here to replace the generated time and date text on the event thumbnail
- Additional Date Text – To be displayed on the single visual template
- Location – give the location
- Details
- Authors
- Subjects
- Primary Organisation
- Secondary Organisation
- Category – up to 3
- Tags – for internally sorting and external searching
- Front-end
- Thumbnail Link
- This content
- Other internal content – choose a page for it to link to
- External Link – choose an external site for it to link to
- Promoted Content – ensures it is promoted above other content
- Primary Video URL – appears at the top of the visual
- Video Duration – this uploads automatically from Vimeo but worth checking
- Show Contributor Image on Thumbnail – to be removed
- Show Featured Image in Post – As default the featured image chosen for the visual will appear within the image as well as on the thumbnail. If you would NOT like this then unclick
3D Books
3D Flip books are used as a way of sharing pdfs within the site. They have no other function. We do not make them searchable or accesible except if they are inserted into something else.
To make a 3D Flipbook
- Open 3D Flipbooks
- Choose add new and name the pdf
- Do not complete any other information
- Under Details choose Select PDF
- Drag your pdf into the pdf library and then select it
- Save your 3D Book
Standard functionality has been chosen for the 3D book – including the ability to download, save and print the 3D book. If you want to disable these functions go to Control Properties and unclick the appropriate boxes.
3D Books can be used on pages using the eBook viewer. They can also be added to text boxes. Caution should be taken when adding into other elements, particularly when viewed on a mobile.
3D Books should not be used within CCX Courses as functionality clashes.
To create a link to a 3D book use the shortcode available for each one.
You can place a 3Dbook in a light box. When you bring up the dialog to insert one go to the ‘view mode’ tab and click ’thumbnail and lightbox’. Include the title of the book as text beneath it too.
Examples
CCX People
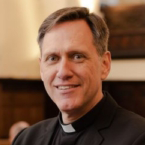
Bishop Ric Thorpe
The Rt Revd Dr Ric Thorpe was appointed as Bishop of Islington in 2015 to oversee the Diocese of London’s work on church planting and growth. He serves the Church of England nationally as “bishop of church planting”, supporting bishops, dioceses, church planters and pioneers, developing church planting strategies to plant new worshipping communities to reach new people in new and renewed ways. Ric leads the Gregory Centre for Church Multiplication, which offers training and support on church planting and growth for the full breadth of the Church, and heads the annual Multiply Church Planting Conference. He is the chair of the Intercontinental Church Society (ICS), an Anglican organisation that serves English-speaking people all over the world. He also works with Plant Anglican, the Anglican Communion Church Planting Network, and Exponential Europe. He is proud to support Tearfund as an Ambassador. In May this year Ric was elected to the role of Archbishop of Melbourne, Australia. He will continue to lead CCX until late October. He is married to Louie and they have three children.
Accordion title
Accordion introduction donec sed odio dui. Donec sed odio dui. Cum sociis natoque penatibus et magnis dis parturient montes, nascetur ridiculus mus. Nulla vitae elit libero, a pharetra augue. Donec sed odio dui.
Together we cover an overview of the Bible, discovering God’s story from Genesis to Revelation and what this means for us now. We spend time looking at what evangelism means and give you the tools to help share your faith. We check in on our own personal development and have space to think about our identity and the callings God has given us. We dive into some of the big questions of life and how we can approach them in light of Jesus. We talk about practical leadership skills and share ideas of how to grow teams and disciple others.
In a word – no! The course is designed for anyone who feels passionately called to estates ministry. Ongoing, approachable support for course members is built into the course’s DNA. Throughout the course we regularly take time to chat with each other about what God has been speaking to you about, what you’re learning and how you’re going to put it into action. We also encourage everyone to have a Learning Mentor to journey alongside you between the sessions.
There’s no exam, but at the end of the course, you will need to demonstrate your learning. It doesn’t have to be an essay: you could make an art piece, write a poem, record a song, have an interview – we are open to varied ways of you showing the journey you’ve been on. You will become a Commissioned Estate Leader and be sent out to wherever and whatever God is calling you to.
It costs your time and your commitment, but it doesn’t cost any cash.